Okay, so, I gotta tell you about this black on black NY Yankees cap I just finished customizing. It was a whole thing, but totally worth it.
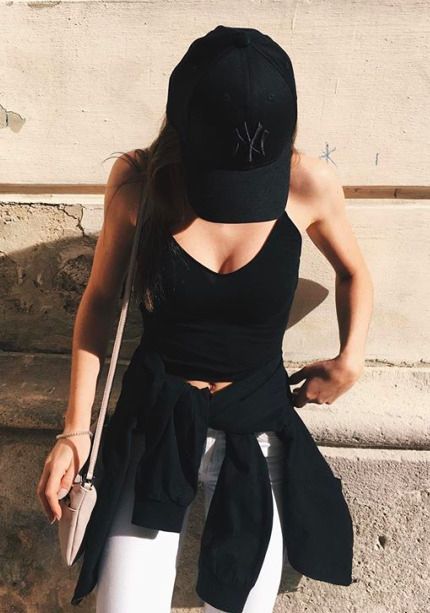
The Idea: I saw this pic online of a super clean, all-black Yankees cap. No color, no nothin’, just pure black on black. I thought, “Damn, that’s slick.” My old navy blue Yankees cap was gettin’ kinda tired, so I figured, why not try and make my own?
Finding the Right Cap: First thing, I needed a base cap. I went to like, three different sports stores lookin’ for a decent, plain black Yankees cap. Most of ’em had some kind of white outline or a colored logo. Finally, I found one at this little shop downtown. It was a New Era 59FIFTY, all black, but the Yankees logo was still stitched in white thread. That was problem number one.
The De-threading Process: This was the tedious part. I got myself a seam ripper from my wife’s sewing kit (don’t tell her!), and started carefully picking out each white stitch. Seriously, this took hours. My eyes were killin’ me. I almost gave up a couple times, but I was too far in to quit. Pro-tip: good lighting is essential. And maybe a few beers to keep you sane.
Sourcing Black Thread: Once the white thread was gone, I needed black thread to re-stitch the logo. Finding the exact right shade of black was harder than I thought. I ended up going to a craft store and comparing a bunch of different spools under different lighting conditions. I finally found one that was a pretty damn close match to the cap’s fabric.
The Re-Stitch: Now, I am NOT a sewer. My stitching skills are… rudimentary, at best. But I figured, hey, how hard can it be? Famous last words, right? I tried to follow the original stitch pattern as closely as possible. It wasn’t perfect, not even close, but from a few feet away, you couldn’t really tell. I used a simple backstitch, try to keep them tight and even.

Fine-Tuning and Details: After the main logo was done, I noticed some stray threads and little imperfections. I used a small pair of scissors to trim everything up and cleaned up the edges. I even took a black permanent marker and carefully colored in some of the tiny white spots I missed. Sneaky, I know, but it worked!
The Result: And there you have it – my black on black NY Yankees cap. It’s not perfect, I know, but I’m pretty proud of how it turned out. It’s way cooler than my old navy one, and it goes with everything. I can throw it on with jeans and a t-shirt for a casual look, or even dress it up a little with a black jacket.
Lessons Learned: Would I do it again? Probably not. It was a pain in the ass. But, I learned a lot about patience, and I got a pretty sweet custom cap out of it. If you’re thinking about trying something similar, just be prepared to put in the time and effort. And maybe invest in a better seam ripper.
- Buy a high-quality base cap.
- Be patient with the de-threading.
- Find the perfect matching thread.
- Take your time with the re-stitch.
- Don’t be afraid to improvise!
Rock that cap with confidence!


